Creating a Kubernetes cluster on Proxmox VE with Terraform & Kubespray
Introduction
As a DevOps engineer, I was tasked with taking more deep dive into how I can take the benefit of Kubernetes in managing containers. I wanted to have a production-like Kubernetes cluster for learning and testing purposes but found the cost of a managed cluster on the cloud to be prohibitively high. The credits of my trial account went away just after a few days of playing around with Kubernetes on the cloud. I started to look for alternative solutions, and my search led me to Proxmox, Terraform, and Kubespray.
 |
|---|
| Photo by Onur Binay on Unplash |
In this blog, I will share my journey and experiences, hoping to inspire you to create your own home lab Kubernetes cluster on Proxmox VE using Terraform and Kubespray.
Table of Contents
Prerequisites
Software requirements
Proxmox Virtual Environment >= 7.3:
Proxmox VE is an open-source server virtualization management solution for creating and managing VMs, containers and HA clusters, etc. To proceed with the installation, you need to have Proxmox VE installed on either a dedicated server or a VM with virtualization enabled.
If you haven’t installed Proxmox VE yet, you can follow the instruction from the official Proxmox website: Download and install Proxmox VE.
Terraform >= 1.3.3
Terraform is an Infrastructure as Code (IaC) tool that enables efficient building, changing and versioning of cloud and on-prem resources. It plays a crucial role in provisioning and setting up VMs on Proxmox VE declaratively.
If you haven’t installed Terraform CLI yet, you can find the installation instruction from the official Hashicorp website: Install Terraform CLI.
Kubespray >= 2.20
Kubespray is a tool shipped with Python, Ansible and a collection of playbooks necessary for making up a production-ready Kubernetes cluster. The good news is that you don’t need to worry about manually installing Kubespray. The installation of Kubespray will be seamlessly handled by Terraform, which we will discuss later.
Anyway, if you are interested in exploring more about this cool stuff, you can check out the official repository: kubernetes-sigs/kubespray.
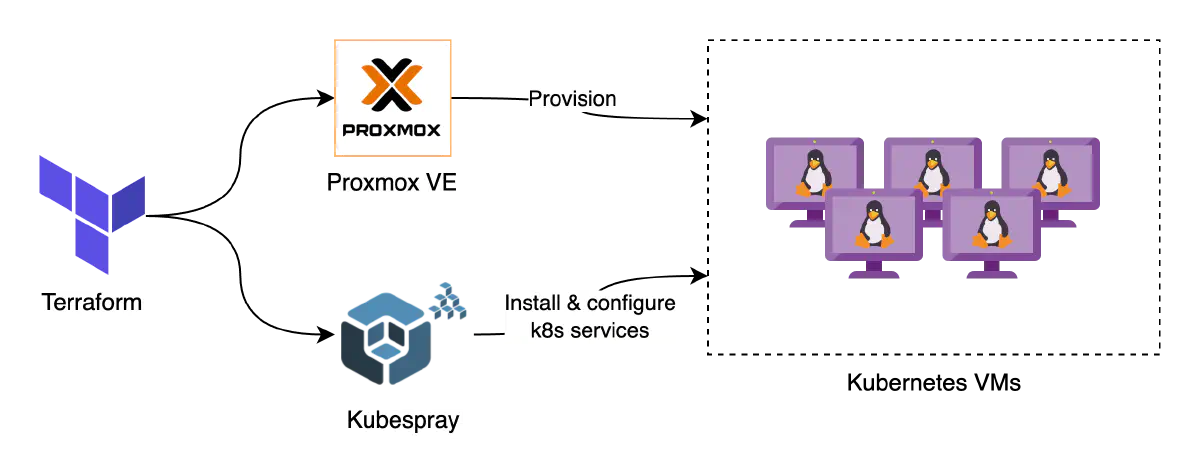 |
|---|
| How Proxmox VE, Terraform and Kubespray play a role in creating a k8s cluster |
System requirements
Before we start the deployment in Proxmox VE, let’s ensure we have the following components in place:
- Internal network
- VM template
- SSH key pair
- Bastion host
In the next section, I will provide a step-by-step procedure on how to configure each of the required components.
Installing required components
If you have already set up these things in Proxmox VE, feel free to skip this section and jump into the next part.
Configuring an internal network
We need to have an internal network set up beforehand. Instead of plugging Kubernetes nodes into the default Proxmox VE bridge vmbr0, I would recommend you to put all of them into a dedicated internal network. This approach offers several benefits, including improved security by isolating the cluster from the LAN network and allowing more granular control over network configurations.
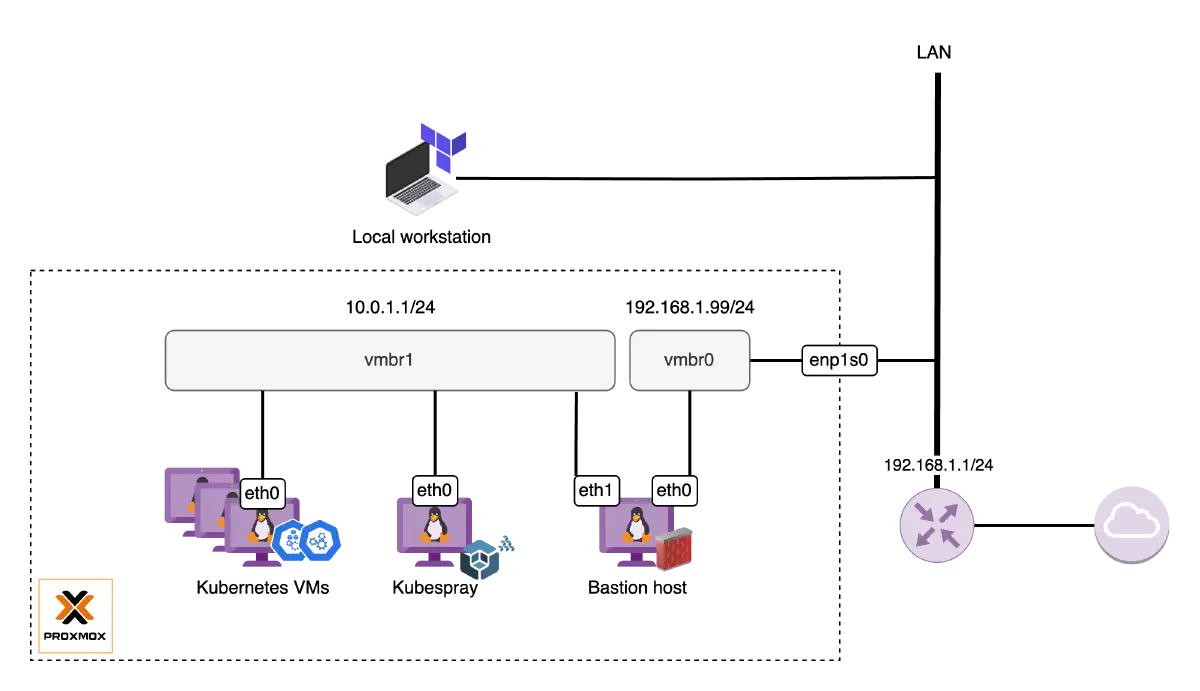 |
|---|
| Rudimentary home lab networking setup |
To configure an internal network in Proxmox VE, follow these instructions:
Start a new shell session on your Proxmox VE server and switch to the Root shell if you haven’t already.
sudo -iTake a backup of the network configuration file
/etc/network/interfaces.cp /etc/network/interfaces /etc/network/interfaces.originalOpen the
/etc/network/interfacesfile in a text editor and append the below configuration for the new networkvmbr1.# /etc/network/interfaces ... ... # Dedicated internal network for Kubernetes cluster auto vmbr1 iface vmbr1 inet static address 10.0.1.1/24 bridge-ports none bridge-stp off bridge-fd 0 post-up echo 1 > /proc/sys/net/ipv4/ip_forward post-up iptables -t nat -A POSTROUTING -s '10.0.1.0/24' -o vmbr0 -j MASQUERADE post-down iptables -t nat -D POSTROUTING -s '10.0.1.0/24' -o vmbr0 -j MASQUERADEThe above configuration does the following:
- Define the new network bridge
vmbr1that should be brought up during system boot. - Assign it a fixed IP address
10.0.1.1with a subnet mask of/24. This presents a network range from10.0.1.0to10.0.1.255. - Configure Masquerading (NAT) with
iptablesthat allows any outgoing traffic (internet access) from the Kubernetes VMs can happen throughvmbr0.
- Define the new network bridge
Execute
ifreloadcommand to apply the changes.ifreload -aIf for any reason
ifreloaddoes not bring up the network, it’s worth considering a server reboot.
Please note that the given configuration is a rudimentary example. You may need to customize it further to suit your specific needs. For more information, refer to this wiki: Proxmox network configuration.
Preparing a VM template
To streamline the VM creation process, it’s vital to prepare an Ubuntu image with some desired configurations and make it a Proxmox VE template. Terraform will create the Kubespray VM and Kubernetes nodes by cloning this template.
The steps to create your own VM template are following:
Start a new shell session on your Proxmox VE server and switch to the Root shell if you haven’t already.
sudo -iRun the following command to create the VM template:
bash -c "$(wget -qLO - https://raw.githubusercontent.com/khanh-ph/proxmox-scripts/master/create-vm-template/script.sh)"Upon completion of the script, you will have a VM template created with the below specification:
- Template VM ID:
9000 - OS:
Ubuntu 24.04 - Capabilities/options enabled:
QEMU Guest Agent,Cloud-init,CPU and Memory hotplug.
- Template VM ID:
In case you want to custom the VM template on your own, you can refer to this blog post: How to create a Proxmox Ubuntu cloud-init image.
Generating an SSH key pair
User authentication is a crucial part that we need to handle. Rather than using a password to log in to the VM, we will configure SSH-based authentication to enhance network security and eliminate the need to remember another password in life.
In this sub-section, I will walk you through the steps of creating a dedicated key pair for the Kubernetes admin user.
Open a terminal on your local workstation.
Create a directory to store the key pair.
mkdir -p ~/proxmox-kubernetes/ssh-keysGenerate an SSH key pair and save it to the specified directory.
ssh-keygen -t rsa -b 4096 -f ~/proxmox-kubernetes/ssh-keys/id_rsa -C "[email protected]"
Now, you’ve successfully created the key pair for k8s admin. Let’s take note of the file locations.
- Private key:
~/proxmox-kubernetes/ssh-keys/id_rsa - Public key:
~/proxmox-kubernetes/ssh-keys/id_rsa.pub
Setting up a bastion host
Being placed within an internal network, all the VMs are not directly reachable. To enable administrative access to the cluster as well as facilitate remote execution of the scripts on Kubespray VM, we need a bastion host to serve as an SSH proxy.
From an infrastructure perspective, the bastion host is a regular VM that is attached to both your LAN network and your internal networks. Below is a step-by-step procedure to provision it:
Start a new shell session on your Proxmox VE server and switch to the Root shell if you haven’t already.
sudo -iCreate a new VM by cloning the VM template we’ve just created.
qm clone 9000 9001 --name bastion --full trueIn the above command,
9000is the ID of the template and9001is the ID of our bastion VM.Configure SSH keys for bastion user authentication.
qm set 9001 --sshkey ~/proxmox-kubernetes/ssh-keys/id_rsa.pubIn this command, I specified the location of the public key we’ve generated for the k8s admin user.
Plug the bastion VM into the LAN network by setting the appropriate IP and gateway configuration. Replace
192.168.1.131with your desired IP.qm set 9001 --net0 virtio,bridge=vmbr0 --ipconfig0 ip=192.168.1.131/24,gw=192.169.1.1Connect the bastion VM to the Kubernetes internal network bridge
vmbr1.qm set 9001 --net1 virtio,bridge=vmbr1 --ipconfig1 ip=10.0.1.2/24,gw=10.0.1.1Configure the bastion VM to start at boot.
qm set 9001 --onboot 1Start the bastion VM.
qm start 9001Verify if you are able to SSH to the bastion VM from within the local network. Replace
ubuntuwith your desired username if you’ve customized it.ssh [email protected] -i ~/proxmox-kubernetes/ssh-keys/id_rsa
In the real-world scenario, it’s of paramount importance to harden the bastion host, and also make it accessible outside of your local network. However, within the context of this blog, they are more of “extra credit” options. You can explore security practice for guidance on hardening the bastion host. To make the bastion publicly accessible, consult with your ISP for assistance in configuring NAT on your specific router model.
Creating the Kubernetes cluster
Now comes the most exciting part. Let’s make your very own Kubernetes cluster.
Overview of the plan
Before we start, let’s go over the plan with Terraform and Kubespray:
- First, we’ll create at least 3 regular VMs on Proxmox VE, which will act as the backbone of the Kubernetes cluster.
- Next, we’ll create an additional VM and install Kubespray on it.
- To personalize the cluster, we’ll customize the Kubespray configuration files:
inventory.iniaddons.yamlk8s-cluster.yaml
- Finally, we’ll transform the regular VMs from the first step into Kubernetes nodes by instructing Kubespray to work its magic.
It might seem a lot but don’t worry, I have made a repository proxmox-kubernetes that simplifies the process with pre-built Terraform stuff.
So, here is the revised plan:
- Clone the repository.
- Configure the necessary Terraform variables to make it your own.
- Run a few Terraform commands.
- Enjoy a cup of coffee while the magic happens.
Sounds much better, right? Let’s get started.
Initiating the deployment
Start by cloning the
proxmox-kubernetesrepository.git clone https://github.com/khanh-ph/proxmox-kubernetes.gitChange your working directory to
proxmox-kubernetes.cd proxmox-kubernetesCheckout the version
5.0.0.git checkout 5.0.0Note: This version has been tested and confirmed with Proxmox VE 8.2. If needed, you may need to try a different version. The table below lists the Proxmox VE versions that have been tested with my project and their corresponding versions.
Proxmox VE version khanh-ph/proxmox-kubernetes 7.3.x 4.1.0 8.0.x 4.1.0 8.2.x 5.0.0 Open the
example.tfvarsfile in a text editor and update all the mandatory variables with your own values.Note: There are optional variables available that allow you to customize your Kubespray configuration to meet your requirements. For more details, refer to the
README.mdfile in the repository proxmox-kubernetes.Initialize the Terraform working directory.
$ terraform initGenerate an execution plan and review the output to ensure the planned changes align with your expectations.
$ terraform plan -var-file="example.tfvars"If you’re satisfied with the plan and ready to apply the changes, run the following command:
terraform apply -var-file="example.tfvars"Terraform will prompt for confirmation before applying the changes. Type yes and press Enter to proceed.
Take a breather and enjoy a cup of coffee while waiting for the deployment to finish.
Setting up SSH configuration
After the cluster provisioning is done, you might want to access the cluster VMs for futher setup and management. Since all the Kubernetes nodes are placed on an internal network, it’s vital to set up the SSH configuration for the Bastion host beforehand. Once configured, we can use the Bastion as a proxy for SSH connections from your local workstation to those internal machines.
Here are the instructions:
On your local workstation, open the
~/.ssh/configfile with your favorite text editor.Define the SSH profile for your Bastion host by appending the following text block to that file:
# ~/.ssh/config
Host k8s-bastion
    HostName 192.168.1.131
    User ubuntu
    Port 22
    IdentityFile ~/proxmox-kubernetes/ssh-keys/id_rsa
Ensure you replace
192.168.1.131with the public-facing IP of your Bastion host.Next, add another block that informs your SSH client how to access the Kubernetes VMs.
# ~/.ssh/config
Host 10.0.1.*
    User ubuntu
    Port 22
    IdentityFile ~/proxmox-kubernetes/ssh-keys/id_rsa
    ProxyJump k8s-bastion
In this example, I’ve used the pattern
10.0.1.*to match all the hosts in my Kubernetes dedicated network10.0.1.0/24. Please adjust the pattern if your network has a different CIDR. The last line is to utilize the Bastion host for stdio forwarding from your SSH client to the SSH server on the target VMs.
Verifying the Kubernetes cluster
Once the deployment is complete, it’s essential to verify the status of all the system pods running on the Kubernetes cluster.
Follow these steps:
Open a new terminal on your local workstation.
Determine the IP of a Kubernetes cluster’s control plane. You can obtain this information from the output of the
terraform applycommand that we executed in the previous section.SSH into the Kubernetes control plane node.
ssh 10.0.1.10When you are on the Kubernetes node, use
kubectlto list all the pods.sudo kubectl get pods -n kube-systemA cluster is considered to be successfully provisioned when all the system pods are up and running. See the below for an example output:
ubuntu@dev-k8s-cplane-00:~$ sudo kubectl get pods -n kube-system
NAME                                                      READY   STATUS    RESTARTS        AGE
calico-kube-controllers-6dd854d97b-j8jfk                  1/1     Running   1 (4d16h ago)   6d16h
calico-node-4b99w                                         1/1     Running   1 (4d16h ago)   6d16h
calico-node-l4kfs                                         1/1     Running   0               6d16h
calico-node-rt5nw                                         1/1     Running   0               5d16h
calico-node-t5ms9                                         1/1     Running   0               6d16h
coredns-79d86db9f9-crbf4                                  1/1     Running   0               6d16h
coredns-79d86db9f9-cvvdl                                  1/1     Running   0               6d16h
dns-autoscaler-7c59b6c489-dq9z9                           1/1     Running   0               6d16h
kube-apiserver-dev-k8s-cplane-00                          1/1     Running   1               6d16h
kube-controller-manager-dev-k8s-cplane-00                 1/1     Running   3               6d16h
kube-proxy-g44dg                                          1/1     Running   1 (4d16h ago)   5d16h
kube-proxy-t5h4b                                          1/1     Running   0               5d16h
kube-proxy-x5dkz                                          1/1     Running   0               5d16h
kube-proxy-xlc9p                                          1/1     Running   0               5d16h
kube-scheduler-dev-k8s-cplane-00                          1/1     Running   1               6d16h
nginx-proxy-dev-k8s-worker-00                             1/1     Running   1 (4d16h ago)   6d16h
nginx-proxy-dev-k8s-worker-01                             1/1     Running   0               6d16h
nginx-proxy-dev-k8s-worker-02                             1/1     Running   0               5d16h
Conclusion
In summary, we’ve successfully provisioned a simple home lab Kubernetes cluster on Proxmox VE with Terraform & Kubespray. This approach allows us to manage the infrastructure in a declarative manner and effortlessly scale up and out nodes within the cluster. While it serves as a solid starting point, there is much more to be done to elevate the cluster to a production-ready environment. Future steps involve enhancing the cluster with features like security, high availability, observability and performance optimization.
Happy Kubernetes-ing!